这部分文档主要展示了自己做出的一些比较拿得出手的效果。剩下还实现了一些数组生成函数比如sin,noise等基础的效果没有特别记录。
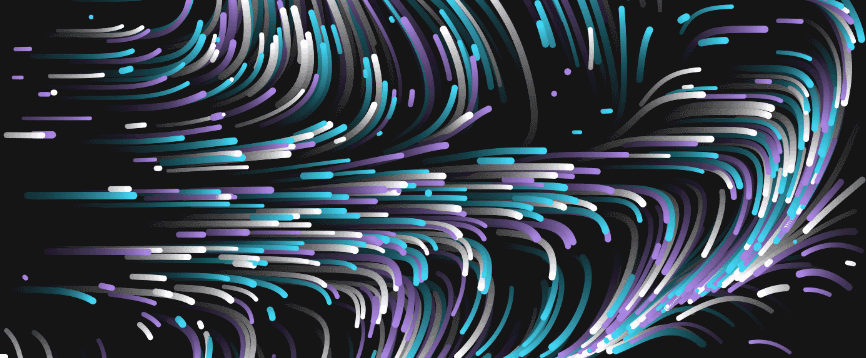
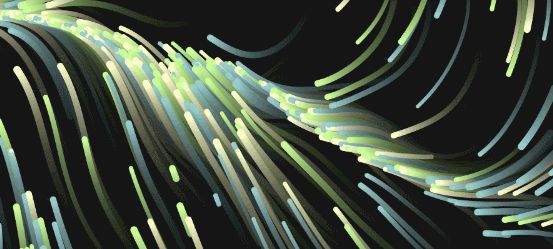
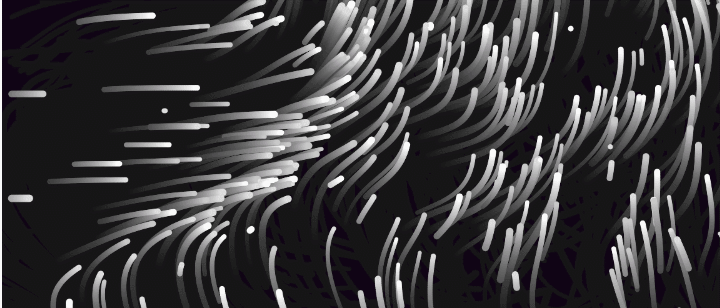
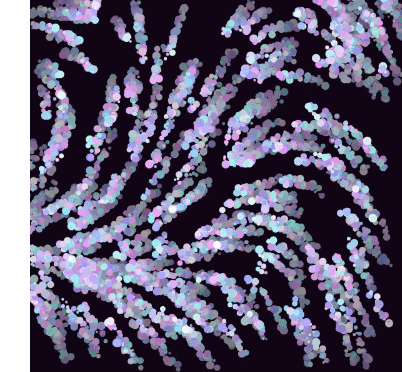
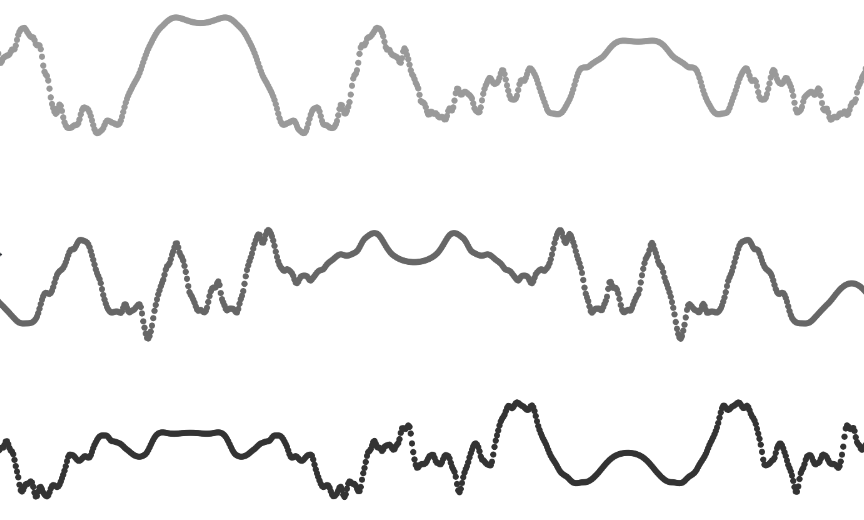
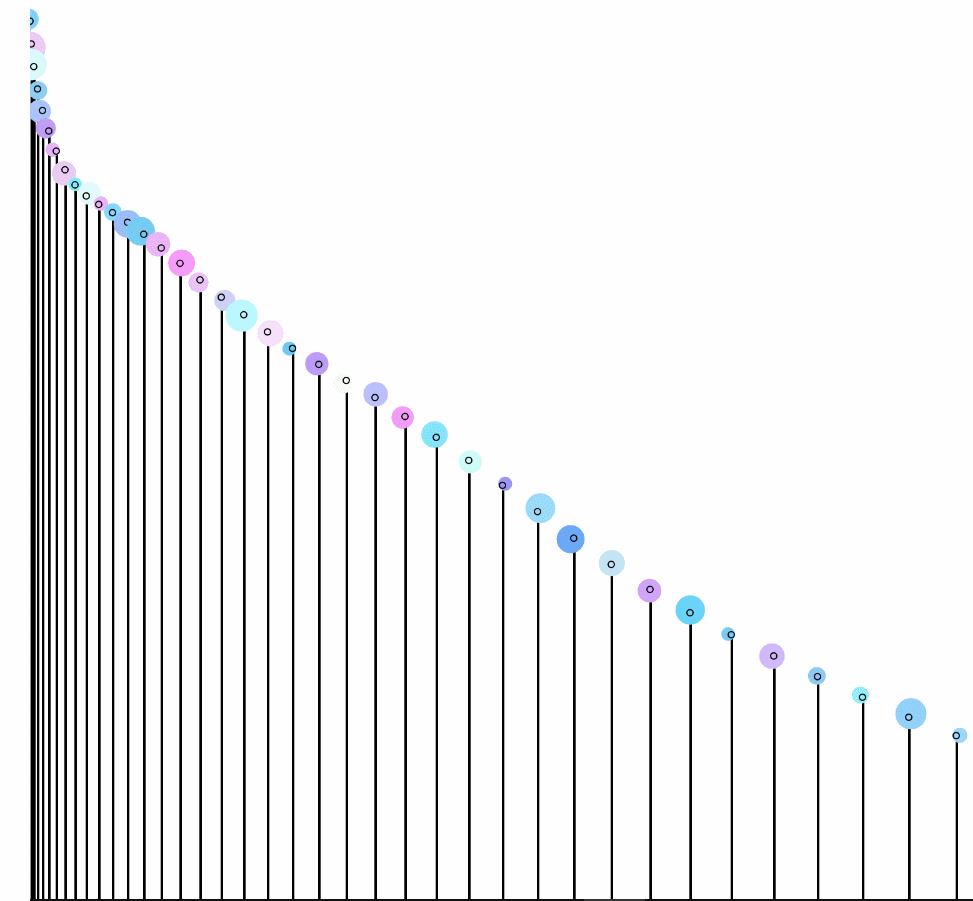
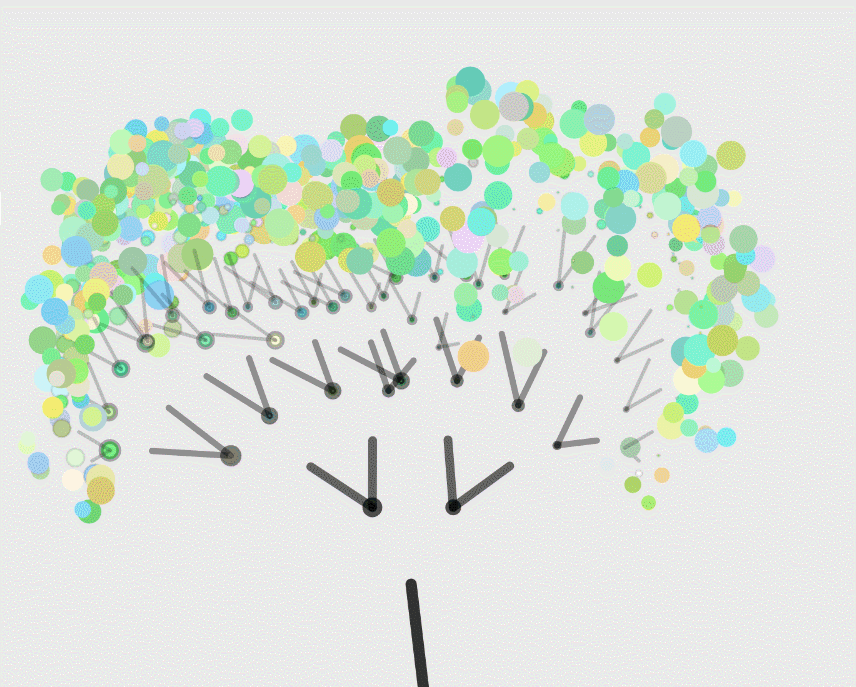
一.数组 运用粒子系统,通过控制线条的疏密以及线条运动的方向,用短而碎的线条运动来体现事物的运动或是水流,烟雾,微风等等“粒子流”的效果。
实现效果:
实现部分核心代码:
此效果核心在于创建一个particle粒子类:
1
2
3
4
5
6
7
8
9
10
11
12
let Particle = function (loc_, dir_, speed_,nscale_,nstrength_ ) { this .loc = loc_; this .dir = dir_; this .speed = speed_; this .noiseScale = nscale_; this .noiseStrength = nstrength_; this .d = 1 ; this .col ; this .angle ; this .vel ; };
并对particle类的一些基础函数进行定义:
1
2
3
4
5
6
7
8
9
10
11
12
13
14
15
16
17
18
19
20
21
22
23
24
Particle .prototype run = function ( this .move (); this .checkEdges (); this .update (); }; Particle .prototype move = function ( this .angle =noise (this .loc .x /this .noiseScale , this .loc .y /this .noiseScale , frameCount/this .noiseScale )*TWO_PI *this .noiseStrength ; this .dir .x = cos (this .angle )+sin (this .angle )-sin (this .angle ); this .dir .y = sin (this .angle )-cos (this .angle )*sin (this .angle ); this .vel = this .dir .copy (); this .vel .mult (this .speed *this .d ); this .loc .add (this .vel ); }; Particle .prototype checkEdges = function ( if (this .loc .x < 0 || this .loc .x > width || this .loc .y < 0 || this .loc .y > height) { this .loc .x = random (width*9.2 ); this .loc .y = random (height); } };
现在我们对粒子流的轨迹生成进行实现,用的最多的还是随机,毕竟随机性总是能给我创造出一些惊喜和意料之外的效果,生成粒子轨迹函数的代码如下:
1 2 3 4 5 6 7 8 9 10 11 var particles = [];let noiseScale = nscale;let noiseStrength = nstrength;noStroke (); for (let i=0 ; i<num; i++) { let loc = createVector (random (width*2.8 ), random (height), 5 ); let angle = random (TWO_PI ); let dir = createVector (cos (angle), sin (angle)); let speed = random (1.5 , 0.8 );particles[i] = new Particle (loc, dir, speed,nscale,nstrength);
对于渲染部分,我们通过在update函数这一部分代码中添加不同的渲染函数实现:
1 2 3 4 Particle .prototype update = function (r ){ ellipse (this .loc .x , this .loc .y , r); }
可以参考这种效果对线条进行粗细和颜色的渲染,当然,我感觉这个的实现重点在粒子流数组生成上。在生成粒子流的基础上可以对其施加不同的渲染效果,我们把不同的渲染添加到particle的update()函数里面:
1 2 3 4 5 6 7 8 9 10 11 12 13 14 15 16 17 18 19 20 Particle .prototype update = function (r ){ var point=[]; point[0 ]=this .loc .x ; point[1 ]=this .loc .y ; stroke ([255 ,255 ,255 ]); rect (this .loc .x , this .loc .y ,random (-3 ,3 ),this .loc .y +random (-3 ,3 )); renderSpriteOnTrace_wheel (this .loc .x ,this .loc .y , random (10 ,40 ),frameCount,rotateCount,mouseX) };
上面的update函数专门用来添加不同效果的渲染!
1 2 3 rect (this .loc .x , this .loc .y ,this .loc .x +random (this .loc .x ,3 ), this .loc .y +random (-this .loc .y ,3 ));
1 2 3 4 5 6 7 var point=[]; point[0 ]=this .loc .x ; point[1 ]=this .loc .y ; renderTrace_colorPoints (point,3 , 12 , 0.1 , 0.9 ,240 ,100 ,150 ,3 ); rect (this .loc .x , this .loc .y ,this .loc .x +random (-this .loc .x ,3 ), this .loc .y +random (-this .loc .y ,3 ));
1 2 3 4 5 6 var point=[]; point[0 ]=this .loc .x ; point[1 ]=this .loc .y ; renderTrace_colorPoints (point,3 , 12 , 0.1 , 0.9 ,240 ,100 ,150 ,3 );
1 2 3 4 5 6 7 var point=[]; point[0 ]=this .loc .x ; point[1 ]=this .loc .y ; renderTrace_colorPoints (point,3 , 12 , 0.1 , 0.9 ,240 ,100 ,150 ,3 );rect (this .loc .x , this .loc .y ,random (-3 ,3 ),this .loc .y +random (-3 ,3 ));
1 2 3 4 5 stroke ([255 ,255 ,255 ]);rect (this .loc .x , this .loc .y ,random (-3 ,3 ),this .loc .y +random (-3 ,3 ));renderSpriteOnTrace_wheel (this .loc .x ,this .loc .y ,random (10 ,40 ),frameCount,rotateCount,mouseX);
1 2 3 rect (this .loc .x , this .loc .y ,random (0 ,10 ), random (0 ,10 ));
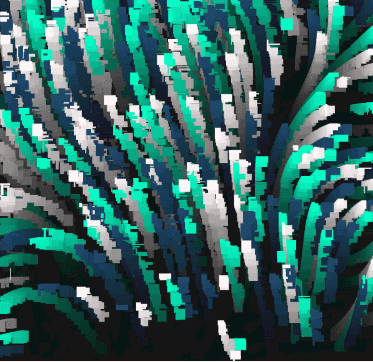
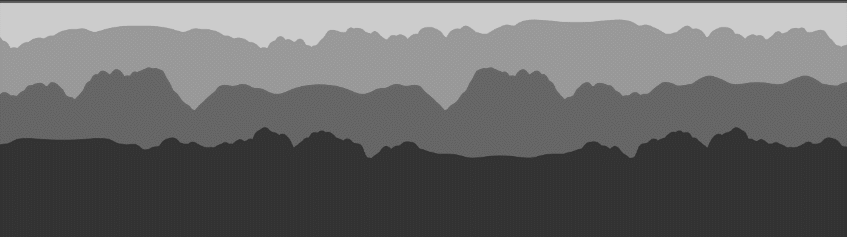
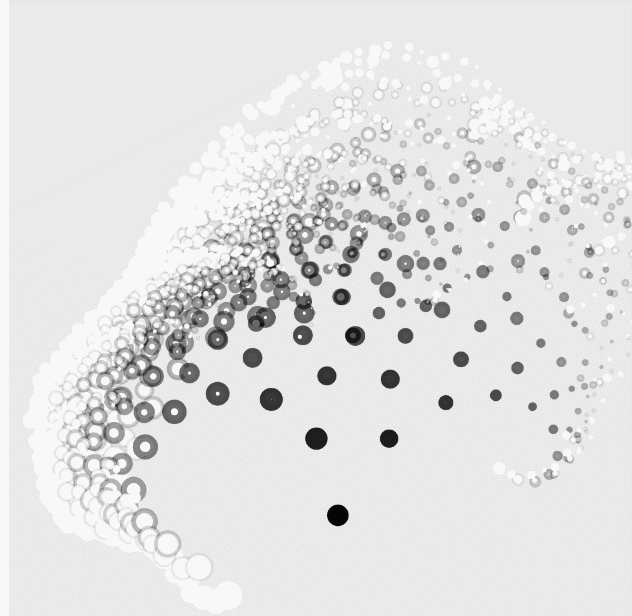
比较常见的群山曲线(其实也可以叫做心电凸曲线),配合线条的运动效果更佳。
实现效果:
实现部分核心代码:
1 2 3 4 5 6 var layers = [];var step = (height-120 )/num;for (var i=0 ; i<num; i++) { layers[i] = new Layer (-40 +i*step, random (2000 ), i+1 ); }
对于这个类,只有两个比较简单的函数:layer的构造函数和渲染相关的display函数。
1 2 3 4 5 6 7 8 let Layer = function (_start, _noize, _speed ) { this .start = _start; this .noize = _noize; this .speed = _speed; this .yOff =0 ; this .yOff2 =0 ; };
之后要使用不同的渲染方式,也可以在display渲染里面进行添加:
1
2
3
4
5
6
7
8
9
10
11
12
13
Layer.prototype.display = function(t){ this.yOff = this.yOff2; var step = (height-120)/num; noStroke(); for (var x=0; x<width; x+=1) { var y = this.start +noise(this.noize+sin(this.yOff)*5)*step*3; //----------------------群山曲线渲染方式---------------------- //基础渲染方式:使用rect逐条填充 rect(x, height, 1, -height+y); this.yOff+=TWO_PI/(width); } this.yOff2=t*this.speed;
使用rect逐条填充群山曲线渲染效果 :
1 2 rect (x, height, 1 , -height+y);
使用****针对点的色彩渲染来渲染群山曲线 :
1 2 renderTrace_colorPoints (point,10 , 25 , 0.1 , 0.6 ,240 ,150 ,100 ,3 );
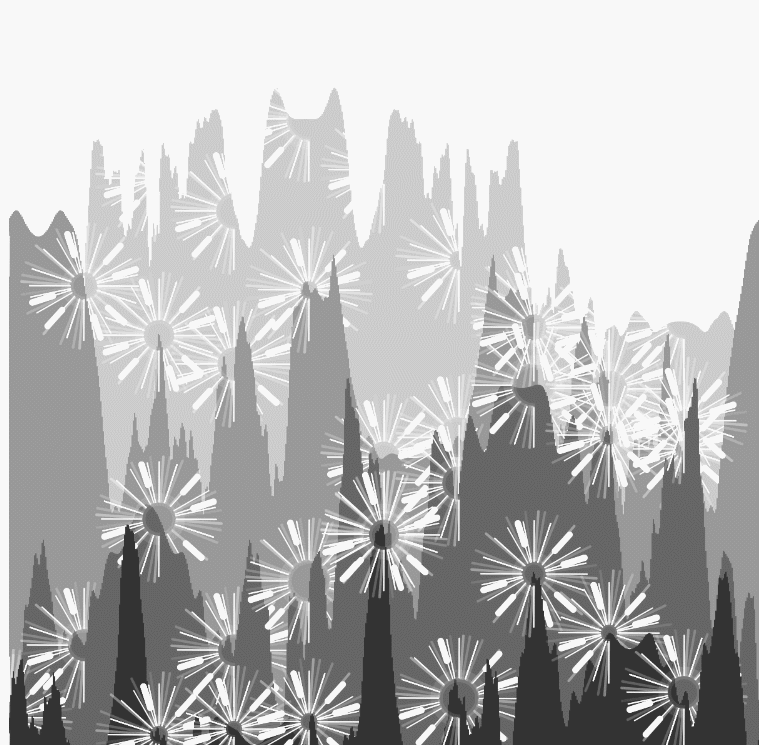
普通圆形显示群山曲线 :
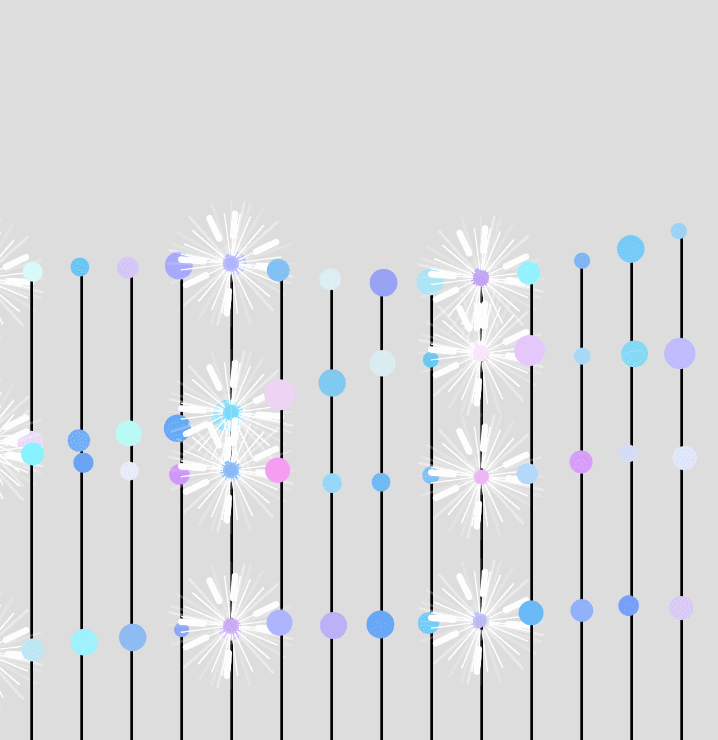
混合渲染效果 :我把rect逐条填充群山曲线渲染,针对点的色彩渲染 ,以及旋转花朵效果结合在一起,误打误撞得到了还不错的效果(缺点是可控性比较弱):
1 2 3 4 5 6 7 8 9 10 11 12 13 14 15 16 17 18 19 20 21 rect (x, height, 1 , -height+y);renderTrace_colorPoints (point,10 , 25 , 0.1 , 0.6 ,240 ,150 ,100 ,3 );ellipse (x,y,5 ,5 ); flowerScaleT = random (0.8 , 2 ); flowerDelay.val = round (random (200 , 250 )); flowerBright = 255 ; flowerColor = color (random (0 ,200 ), random (0 , 255 ), random (0 , 255 )); flowerScale.val = 0.0 ; flowerScaleT = 1.0 ; flowerWidth=40 ; flowerHeight=80 ; renderSpriteOnTrace_flower (x,y,flowerDelay,flowerBright, flowerColor,8 ,20 ,flowerScale,flowerScaleT);
效果如下,可能是因为旋转花朵比较特殊,合起来以后没有出现花朵,但是得到了我意料之外的结果:
1 2 3 4 5 6 7 8 9 10 11 12 13 14 15 16 17 for (var x=0 ; x<width; x+=40 ) { var y = this .start + noise (this .noize +sin (this .yOff )*5 )*step*3 ; rect (x, height, 1 , -height+y); var point=[]; point[0 ]=x; point[1 ]=y; renderTrace_colorPoints (point,10 , 25 , 0.1 , 0.6 ,100 ,150 ,240 ,3 ); if (x%50 ==0 ){ renderSpriteOnTrace_wheel (x,y,10 ,frameCount,rotateCount,mouseX); } this .yOff +=TWO_PI /(width); } this .yOff2 =t*this .speed ;
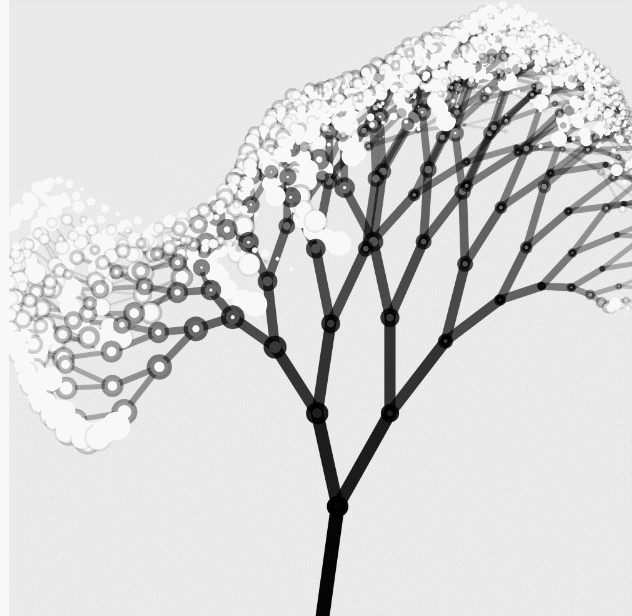
调用以上代码进行渲染,可以得到的效果如下:
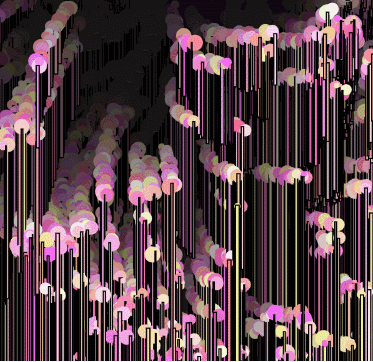
转轮+rect混合渲染效果:
添加元素后渲染得到的效果:在用rect渲染的基础上再添加一些元素,最好是设置一个间隔(不然转轮会过于密集而且会很卡)
1 2 3 4 5 6 //1.使用rect逐条填充 rect(x, height, 1, -height+y); //5.转轮渲染 if(x%60==0){ renderSpriteOnTrace_wheel(x,y,10,frameCount,rotateCount,mouseX); }
得到的效果如下,(好像它们都在爬山一样,鼠标一动每一个转轮的转速还会加快)。
实现部分核心代码:
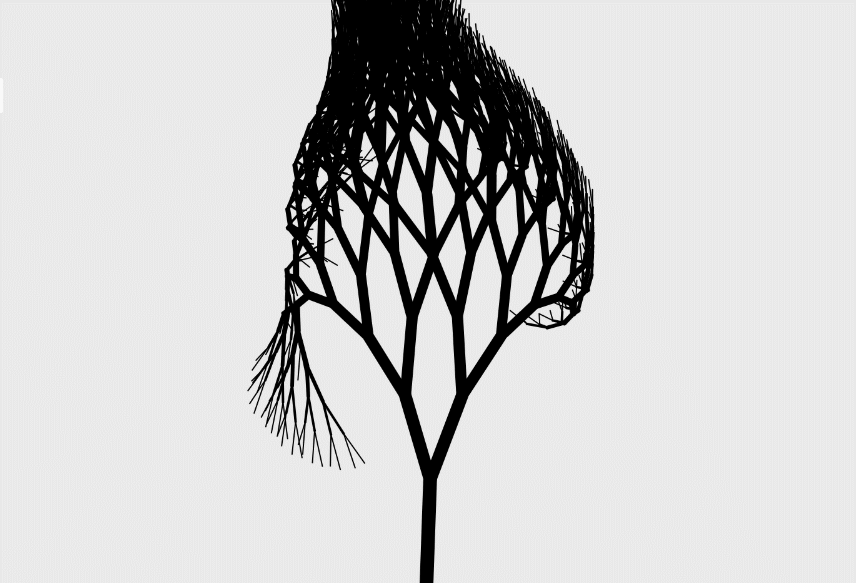
1 2 3 4 5 6 7 8 9 10 11 12 13 14 15 16 17 18 19 20 21 22 23 24 25 26 27 28 29 30 31 32 33 34 35 36 if (c){ d=19 -c/2 ; strokeWeight (c--); stroke (0 ,0 ,0 ,c*25 ); n=noise (x/w-t,y/w+t)*d; if (type==0 ){ ellipse (x+=l*cos (r)+d*cos (n),y+=l*sin (r)+d*sin (n),r*4 ,r*4 ); } else if (type==1 ){ line (x,y,x+=l*cos (r)+d*cos (n),y+=l*sin (r)+d*sin (n)) } for (i of [.4 ,-.4 ]) { renderTrace_trees (x,y,r+i,type,c,l*.83 ) } } else { var point=[]; point[0 ]=x; point[1 ]=y; }
我们对分形树基础算法进行一些渲染改造,比如说给它添加上树叶:
1 2 3 renderTrace_colorPoints (point,10 ,25 ,0.1 ,0.6 ,200 ,240 ,200 ,30 );
然后再把代码中的一部分备注取消掉:
以上操作可以得到下面的结果:
在代码中取消掉这一行的备注!
我们就会得到下面的结果:
1 2 renderTrace_trees (h=w/2 ,w,-PI /2 ,0 );
1 2 3 renderTrace_trees (h=w/2 ,w,-PI /2 ,1 ); renderTrace_trees (h=w/2 ,w,-PI /2 ,0 );
1 2 3 4 5 renderTrace_trees (h=w/2 ,w/2 ,PI *2 /3 ,1 )+renderTrace_trees (h=w/2 ,w/2 ,PI *2 /3 ,0 ); renderTrace_trees (h=w/2 ,w/2 ,PI /3 ,1 )+renderTrace_trees (h=w/2 ,w/2 ,PI /3 ,0 );renderTrace_trees (h=w/2 ,w/2 ,-PI *2 /3 ,1 )+renderTrace_trees (h=w/2 ,w/2 ,-PI *2 /3 ,0 );renderTrace_trees (h=w/2 ,w/2 ,-PI /3 ,1 )+renderTrace_trees (h=w/2 ,w/2 ,-PI /3 ,0 );renderTrace_trees (h=w/2 ,w/2 ,PI ,1 )+renderTrace_trees (h=w/2 ,w/2 ,PI ,0 );renderTrace_trees (h=w/2 ,w/2 ,0 ,1 )+renderTrace_trees (h=w/2 ,w/2 ,0 ,0 );
二.形状 1.旋转花朵形状: 可以在前面已经实现的渲染中将“线”的形式改变为不同的形状,调用形状渲染函数,
并且添加一些比较随机的位移旋转函数获得效果格外不同的动图:
动态花朵渲染:
(花朵因为有延迟所以渲染的位置必须是一个定值,所以这个形状拿去渲染动图变换的点往往会出乱子,但是有时候又会有出人意料的效果。)
1 2 3 4 5 6 7 8 9 10 11 12 13 14 15 16 17 18 19 20 21 22 23 24 25 26 27 28 29 30 translate (x,y); if (flowerDelay.val < 0 ) { push (); flowerScale.val += (flowerScaleT - flowerScale.val ) *0.03 ; scale (flowerScale.val ); rotate (flowerScale.val *3 ); noStroke (); fill (hue (flowerColor), saturation (flowerColor), flowerBright); ellipse (0 , 0 , flowerWidth, flowerHeight); rotate (180 ); ellipse (0 , 0 , flowerWidth, flowerHeight); rotate (180 ); ellipse (0 , 0 , flowerWidth, flowerHeight); fill ('white' ); ellipse (0 , 0 , 5 , 5 ); pop (); } else { flowerDelay.val --; } translate (-x,-y);
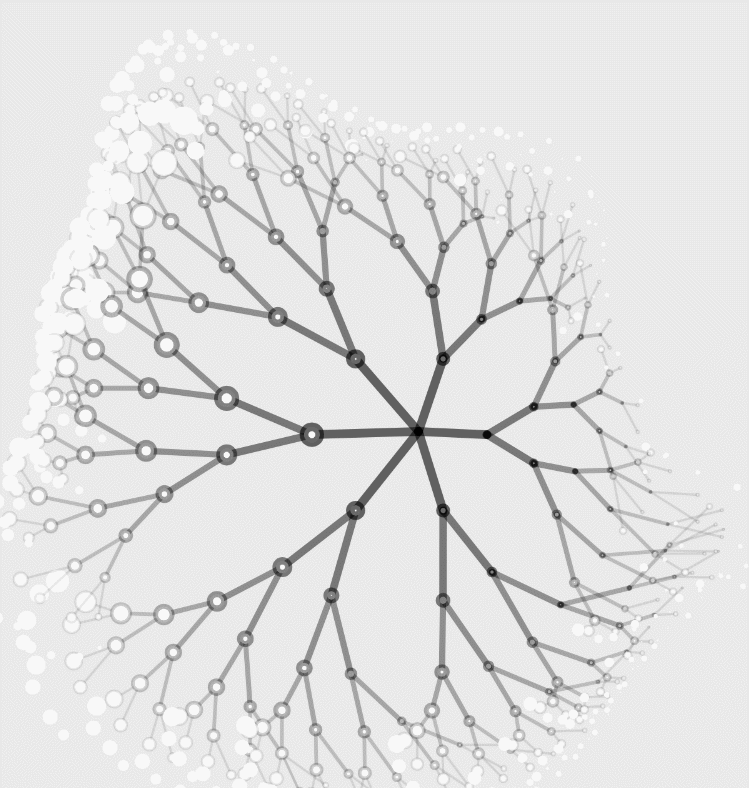
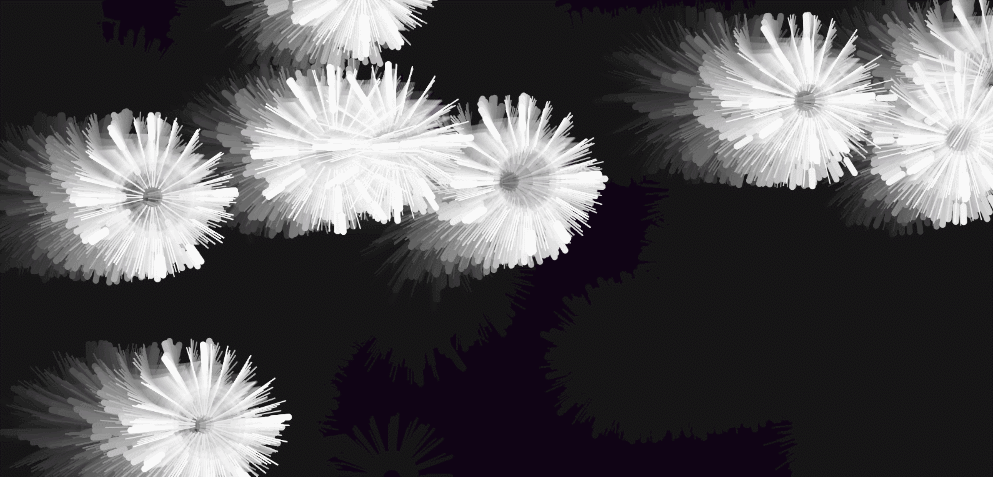
2.转轮形状: 单个转轮实现:实现部分核心代码 :
1 2 3 4 5 6 7 8 9 10 11 12 13 14 15 16 17 18 19 20 21 22 23 24 25 26 27 28 29 push (); translate (x,y); stroke (255 ,30 ); strokeWeight (10 ); noFill (); ellipse (0 ,0 ,midR*2 ); strokeWeight (2 ); ellipse (0 ,0 ,midR*2 *0.9 ); rotate (noise (frameCount/150 )*2 + mouseX/50 ) for (var i=0 ;i<rotateCount;i+=1 ){ rotate (i*PI *2 /rotateCount) stroke (255 ,30 ) strokeWeight (2 ) line (50 ,0 ,midR*0.9 ,0 ) push () strokeWeight (( i%5 ==0 ?5 :1 )) stroke (255 ) rotate (cos (-frameCount/80 )*2 ) line (midR+30 ,0 ,midR*1.2 +( i%5 ==0 ?10 :-5 ),0 ) pop () } pop ();
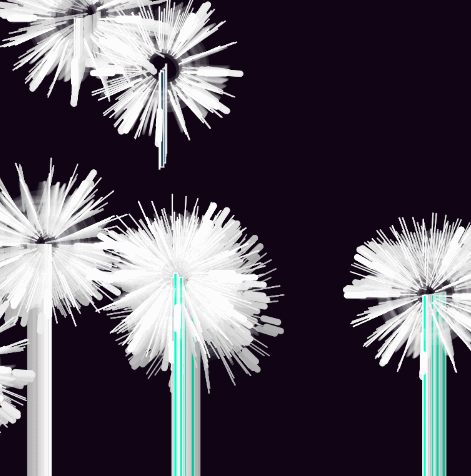
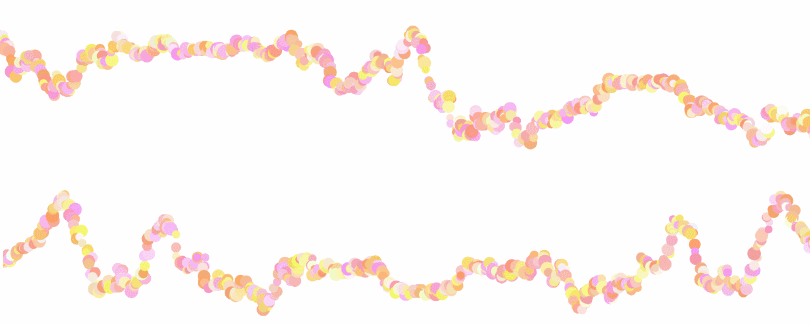
转轮形状渲染,配合sin数组生成为坐标位置得到的效果: 转轮形状渲染,配合粒子流数组生成为坐标位置得到的效果:
我太喜欢这个效果了↓↓↓,黑白唯美,转轮看起来像是昙花(或是白菊),意境也够,有相对比较少量的交互——鼠标横坐标x能提高转速。
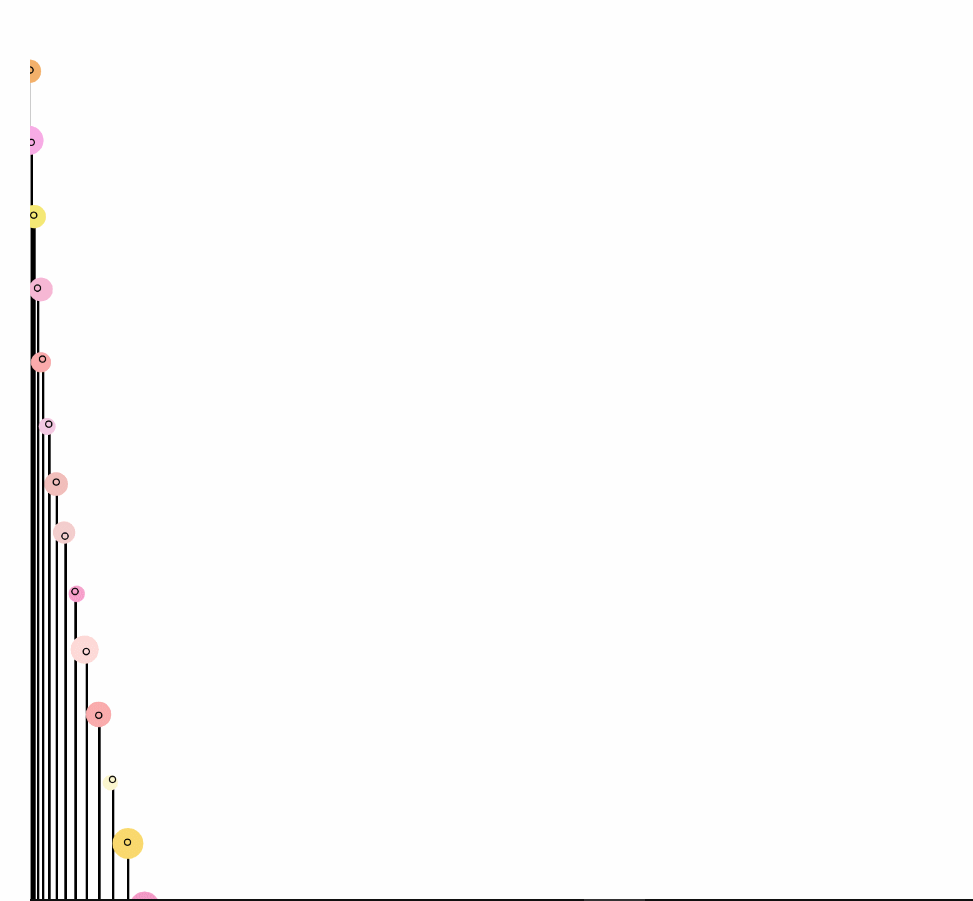
1 2 3 4 5 6 7 8 9 10 11 12 13 14 15 16 17 18 19 20 21 22 var rdn0 = random (255 );var rdn1 = random (255 ); var h = r+(round (random (255 -r))); var s = g+(round (random (255 -g))); var b = b+(round (random (255 -b))); var a = random (minAlpha, maxAlpha); fill ([h, s, b], a); var diam = random (minDiam, maxDiam); var jitterX = random (-n, n); var jitterY = random (-n, n); stroke ([h, s, b], a); ellipse (points[0 ] + jitterX, points[1 ] + jitterY, diam, diam,[h,s, b]); stroke (0 ,0 ,0 );
4.色块晕染形状: 以上已经试着做了不少特定图形形状,但还是没有办法实现比较惊艳的色彩晕染。
我观察一些比较惊艳的效果,对他们的代码进行了研究,发现他们中许多实现都运用到了着色器shader↓。
Introduction to p5.js shaders (itp-xstory.github.io)
在学习计算机图形学时,我跟着youtube教程对着色器语言GLSL已经略有了解,现在试着临摹制作openprocessing中看到的色块晕染效果,并试着把它封装,运用到我自己的库中。
noise也是生成程序纹理常用的基本工具之一。我查了一些资料,了解到色块的晕染效果是通过多级单纯形分形噪声叠加渲染而成的。
它的第一步是调用eclipse画一个圆,剩下的工作就都交给着色器了。
单纯形分形噪声
在某些应用中,单纯形噪声过于平滑,无法产生“真实”的效果。观察上面的图像,你可能会注意到它们很“模糊”。在某些情况下,更多的随机性是可取的。这就是单纯形分形噪声有用的地方。单纯形分形噪声将不同频率的多个单纯形噪声函数叠加在一起,以产生更“嘈杂”的结果。
参考下列噪声算法完成我们的工作:
GLSL噪声算法的收集:(34条消息) GLSL - 噪声算法的收集_长生但酒狂的博客-CSDN博客
在着色器语言GLSL中:
attribute表示当顶点着色器在每个顶点运行时它修饰的变量每次都不一样。
uniform表示当顶点着色器在每个顶点运行时它修饰的变量每次都一样。
varying表示当顶点着色器在每个顶点运行时它修饰的变量的值最终都需要传递给片段着色器。因为三个顶点可以定义一个三角形,而很多像素才能装配一个三角形,所以varying修饰的变量的值将经过插值后分配给片段着色器。
实现部分核心代码:
1 2 3 4 5 6 7 8 9 10 11 12 13 14 15 16 17 18 19 sh.setUniform ("u_time" , millis ()); if (frameCount%(100 /v) == 0 ){resetShader ();ellipseMode (CENTER );fill (color);ellipse (x,y,size,size,20 );this .shader (sh);} rect (-width/2 ,-height/2 ,width,height);
单黑色色块渲染效果: 随机色在画布上随机点渲染:
1 2 3 4 5 6 let size = min (width,height) * random (0.3 ,0.5 ); let mycolor = color (240 , random (180 , 220 ), random (180 , 240 )); let x=random (-width/2 ,width/2 ); let y=random (-height/2 ,height/2 ); let v=2 ; renderTrace_colorBlock (myShader,frameCount,mycolor,x,y,size,v)
→→→
需要注意的一点是,由于转轮效果和旋转着盛开的❀的效果由要注意。于本身就具有一定的动态。把它们添加一些代码里面去时可能会出现一些问题:比如说页面卡顿(因为添加的转轮太多),比如说旋转的花朵显示不出来(这可能是因为每一帧都在刷新,还没来得及盛开就被刷新过去了)…所以使用时要注意一点。
→→→
上面的效果里只有色块渲染是要创建webGL模式的画布的!需要特别注意,模式弄错了对效果的影响很大。
→→→
A1是由单张单张图片组成的,代码总体而言可能会有些混乱,因为我把我试过的效果都放在了备注里面,这样就可以mark住不错的效果,可以试试取消备注看效果。
渲染函数有一部分在lineAryLib_0215.js的particle类的update函数里和layer类的display函数里面,分形树效果也可以进行调整,就在renderTrace_trees里面。