整理了本科一些小demo的文档。(这个文档有四十多张图,可以说当时为了混工作量真的很努力了…很多动态看上去效果也不如实际运行好,所以整理的时候动图改成普通图片了QAQ。)
建议运行尝试,这里的截图效果一般。
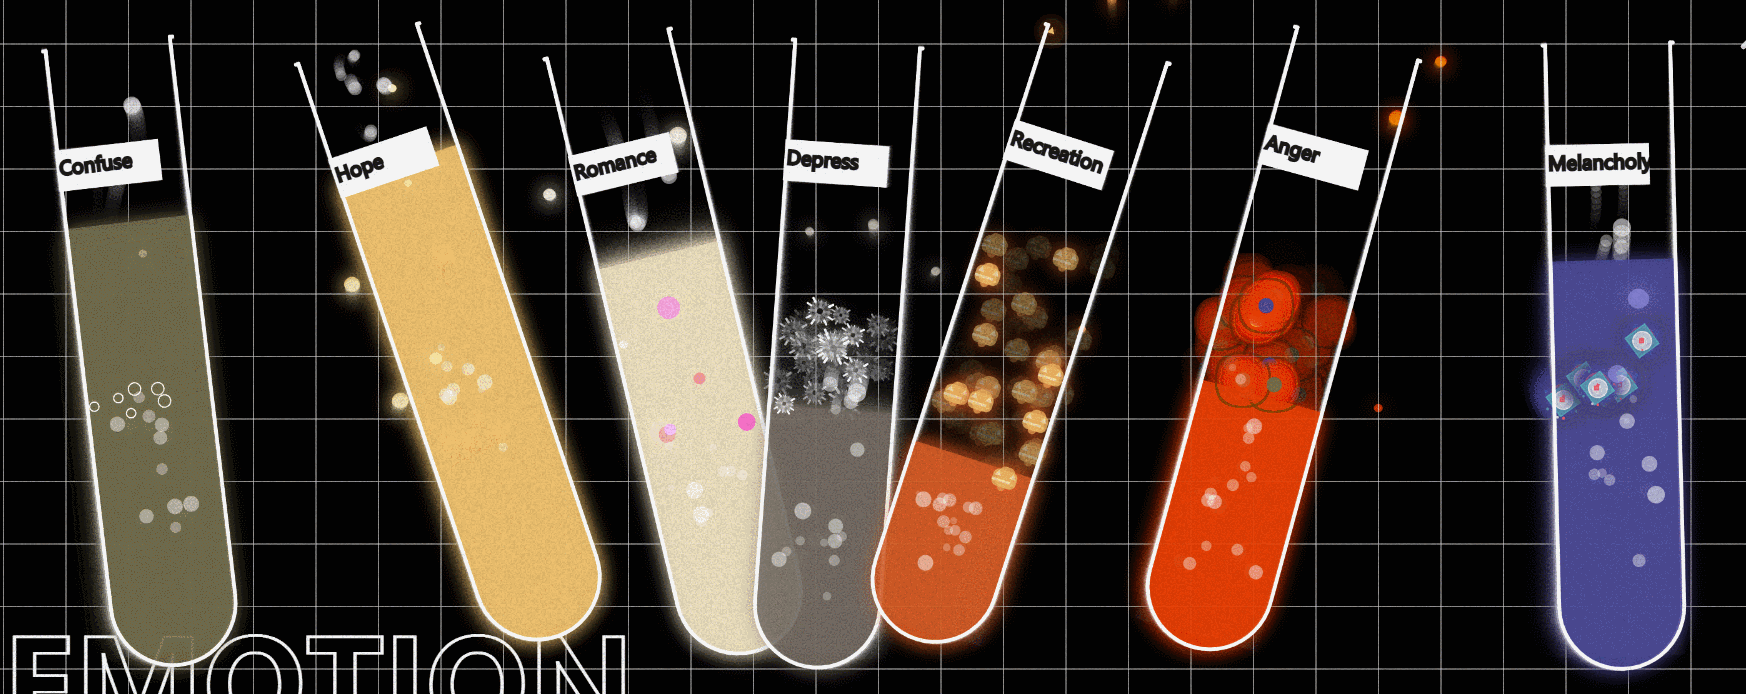
实验室基本设定:
浸泡在溶液中的情绪粒子较为稳定,会缓缓在溶液中游弋。而暴露在空气中的情绪逐渐走向激烈或者是最终消散。
2.当实验者对两种情绪进行相加混合以后,试管中溶液底色会混合,同时会出现这两种情绪粒子的渲染效果。如下图所示,分别是当【愤怒】情绪粒子混合了【忧郁】情绪粒子和【浪漫】情绪粒子混合【压抑】情绪粒子:
3.实验混合过程中随机效果的诞生
(可能是不一样的情绪粒子渲染方式,也可能是溶液颜色的骤然变化)
这次实验的灵感来自于openprocessing中实现的试管溶液混合效果。
作者实现了鼠标点击试管提取溶液,释放鼠标将其于目标试管的溶液混合的功能。
参考链接:200525 Glowing Liquid Lab - OpenProcessing
在进行自己的调整以后,我修改为了我自己的Tube类。
其大致框架如下所示:
update()函数除了负责控制试管的位置随鼠标变化,还会对试管气泡生成,溶液颜色变化,情绪粒子的渲染进行控制。代码较多,仅以情绪粒子渲染位置控制为例展示部分代码:
1 2 3 4 5 6 7 8 9 10 11 12 13 14 15 16 17 18 19 20 21 22 for (let i=0 ; i<num; i++) { this .emotionLiquid [i].xlow =0 this .emotionLiquid [i].xhigh =this .size .x -10 this .emotionLiquid [i].ylow =lqStartY this .emotionLiquid [i].yhigh =lqHeight this .emotionLiquid2 [i].xlow =0 this .emotionLiquid2 [i].xhigh =this .size .x -10 this .emotionLiquid2 [i].ylow =lqStartY this .emotionLiquid2 [i].yhigh =lqHeight this .emotionLiquid3 [i].xlow =0 this .emotionLiquid3 [i].xhigh =this .size .x -10 this .emotionLiquid3 [i].ylow =lqStartY this .emotionLiquid3 [i].yhigh =lqHeight } this .liquidColor ,this .liquidColor ,this .liquidColor ,this .rendermode ,this .randEffect , 0 ,lqStartY,this .size .x ,lqHeight-10 );
除此之外我需要实现基础的情绪粒子类,让这种粒子能够在试管的范围内运动,在浮出溶液范围外和运动变得更加剧烈同时消散的也更快。该类的大致框架如下图所示:
下面仅展示部分功能实现代码:
实现溶液粒子随着试管运动的重要函数checkEdges(),通过边缘检测来实现:
1
2
3
4
5
6
checkEdges (){ if (this .loc .x < this .xlow *0.7 || this .loc .x > this .xhigh *0.7 || this .loc .y < this .ylow || this .loc .y > this .yhigh ) { this .loc .x = random ((this .xhigh -this .xlow ))+this .xlow ; this .loc .y = random (this .yhigh -this .ylow )+this .ylow ; } };
对于情感粒子在试管溶液的位置数组生成,我使用了A1A2中自己编写的函数lineAry_particle_0215 希望能够实现粒子浸没在溶液中时,缓慢游弋的效果。
1
2
3
4
5
6
7
8
9
10
11
12
13
14
15
16
17
18
19
20
21
function lineAry_particle_0215 (num,nscale,nstrength,xl,xh,yl,yh ){ var particles = []; let noiseScale = nscale; let noiseStrength = nstrength; noStroke (); for (let i=0 ; i<num; i++) { let loc = createVector (random ((xh-xl))+xl, random (yh-yl)+yl, 5 ); let angle = random (TWO_PI ); let dir = createVector (cos (angle), sin (angle)); let speed = random (1.5 , 0.8 ); particles[i] = new emotionParticle ({loc :loc,dir : dir, speed :speed, nscale :nscale,nstrength :nstrength, xlow :xl,xhigh :xh,ylow :yl,yhigh :yh}); } return particles; }
装有【困惑】情绪粒子的试管。
以暗绿色为溶液底色,情绪粒子白边,溶液同色的填充。
在尝试这种渲染效果时并没有想的很多,看到这种效果第一个联想到的情绪就是【困惑】,感觉色调偏暗,灰度较大的颜色 更能反映偏向于中性或是轻微贬义的情绪,比如说本人现在“迷茫”的心境,而白色的圆形边框,莫名让我联想到“迷茫到冒泡”这种描述。
“困惑是我的诚实,寻找是我的勇气。”
渲染实现代码用最基础的ellipse实现,这种渲染方式我在A1,A2中也有实现过。
1
2
stroke ([255 ,255 ,255 ]);ellipse (this .loc .x , this .loc .y , r);
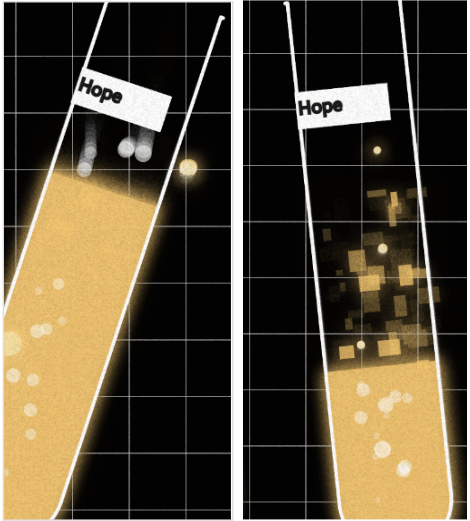
装有【希望】情绪粒子的试管看上去非常平凡,甚至根本看不见试管溶液里的情绪粒子,就好像【希望】它本身不存在一样。
——但是一旦溶液减少,【希望】粒子暴露在空气中,就会发出淡黄色的光芒。
如上面的效果所示,想要表达的含义就是:
“有时似乎看不见希望,但它就在那里。”
——要永远充满希望,这句话给自己,也给很多很多的人。
渲染实现代码仅仅只有一行,这种渲染方式我在A1,A2中也有实现过。
1 rect (this .loc .x , this .loc .y ,random (5 ,20 ), random (5 ,20 ));
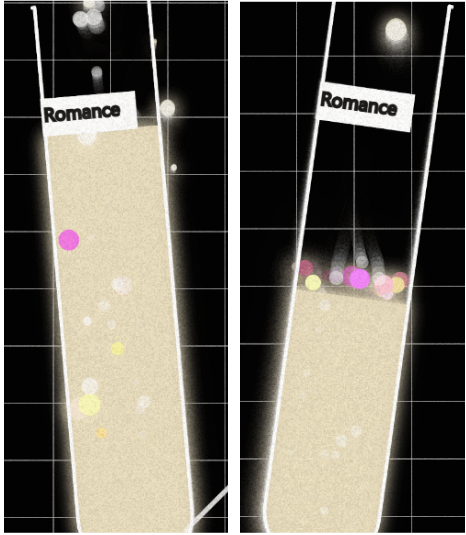
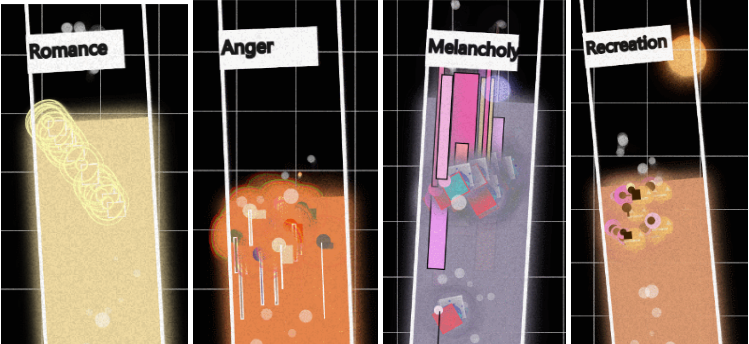
装有【浪漫】情绪粒子的试管。
以奶油白色为溶液底色,使用自制库中的渲染方式renderTrace_colorPoints,情绪粒子为不断变换闪烁的粉色圆形色块。
主要还是通过色彩来表达情感。
灵感来源于少女动漫里的心动粉色气泡,明亮的奶油浅白更能体现情绪的高涨。
“宇宙山河浪漫,生活点滴温暖。”
渲染实现代码使用在A1,A2中实现过的针对点的色彩渲染 。
1 2 3 4 5 6 7 8 9 10 11 12 13 14 15 16 17 18 19 20 21 22 23 24 25 26 27 28 29 renderTrace_colorPoints (point,5 , 20 , 0.1 , 0.9 ,240 ,100 ,150 ,3 );function renderTrace_colorPoints ( points,minDiam, maxDiam, minAlpha, maxAlpha,r,g,b,n ){ var rdn0 = random (255 ); var rdn1 = random (255 ); var h = r+(round (random (255 -r))); var s = g+(round (random (255 -g))); var b = b+(round (random (255 -b))); var a = random (minAlpha, maxAlpha); fill ([h, s, b], a); var diam = random (minDiam, maxDiam); var jitterX = random (-n, n); var jitterY = random (-n, n); stroke ([h, s, b], a); ellipse (points[0 ] + jitterX, points[1 ] + jitterY, diam, diam,[h, s, b]); stroke (0 ,0 ,0 ); }
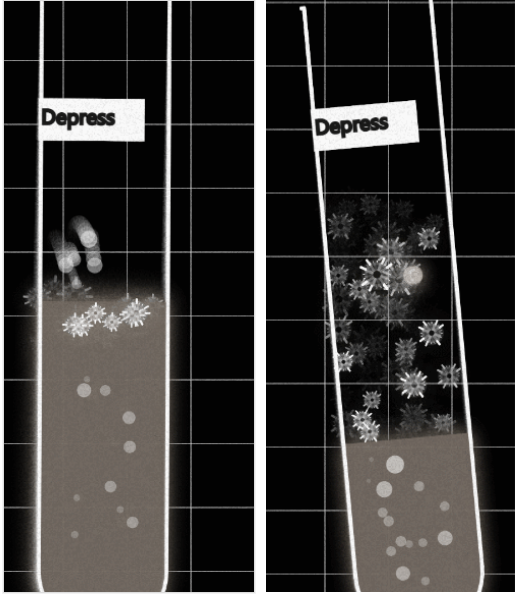
装有【压抑】情绪粒子的试管。
以深灰色为溶液底色,使用自制库中的渲染方式 renderSpriteOnTrace_wheel,情绪粒子为白色雪花(车轮)状,鼠标左右移动会加速其转动。
主要还是通过色彩来表达情感。
深灰色本身容易给人轻微压抑的感觉,白色闪动的情绪粒子,形似雪花,让我联想到电视机接触不良时,屏幕上的雪花纹路。
“舍弃了,便不再压抑。”
情绪粒子渲染实现代码使用在A1,A2中实现过的转轮形状渲染 。
1 2 3 4 5 6 7 8 9 10 11 12 13 14 15 16 17 18 19 20 21 22 23 24 25 26 27 28 29 30 31 32 33 34 35 renderSpriteOnTrace_wheel (this .loc .x ,this .loc .y ,random (5 ,10 ),frameCount,60 ,mouseX);function renderSpriteOnTrace_wheel (x,y,midR,frameCount,rotateCount,mouseX ){ push (); translate (x,y); stroke (255 ,30 ); strokeWeight (midR/2 ); noFill (); ellipse (0 ,0 ,midR*2 ); strokeWeight (midR/5 ); ellipse (0 ,0 ,midR*2 *0.9 ); rotate (noise (frameCount/150 )*2 + mouseX/50 ) for (var i=0 ;i<rotateCount;i+=1 ){ rotate (i*PI *2 /rotateCount) stroke (255 ,30 ) strokeWeight (2 ) line (midR*0.4 ,0 ,midR*0.9 ,0 ) push () strokeWeight (( i%5 ==0 ?midR/5 :midR/25 )) stroke (255 ) rotate (cos (-frameCount/80 )*2 ) line (midR,0 ,midR*1.2 +( i%5 ==0 ?midR/5 :-midR/10 ),0 ) pop () } pop (); } }
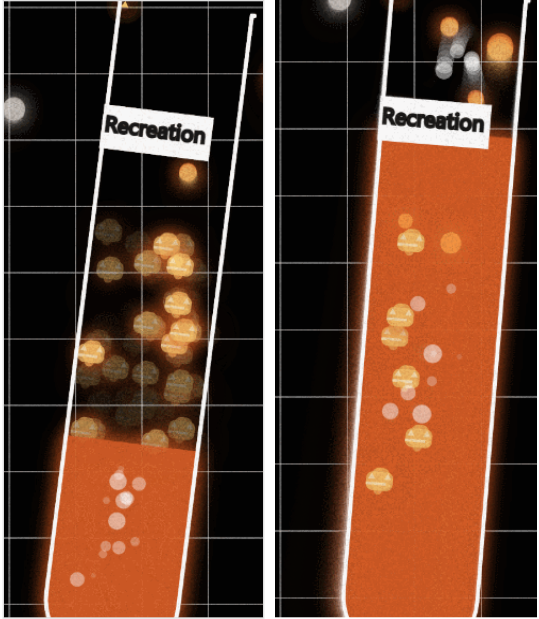
装有【娱乐】情绪粒子的试管。
以橙红色为溶液底色,情绪粒子亮黄色五官,橙色的南瓜头。
灵感来源于“Trick or Treat!”
一开始想要做出”恐惧“的情绪,但是想了一想,万圣节并不一定就和“恐惧”绑定在一起,更多的也有孩子的调皮与快乐。
所以我试着新增渲染方式,用代码画出一个万圣节南瓜头。
“略略略,不给糖就捣蛋 !”
情绪粒子渲染实现代码使用新增的渲染方式,南瓜头形状渲染 。
1 2 renderSpriteOnTrace_pumpkin (this .loc .x ,this .loc .y ,20 ,20 );
新增渲染方式的实现代码如下:
1 2 3 4 5 6 7 8 9 10 11 12 13 14 15 16 17 18 19 20 21 22 23 24 25 26 27 28 29 30 31 32 33 function renderSpriteOnTrace_pumpkin (x, y, w, h ) { beginShape () noStroke (); fill (colors[1 ]); push (); translate (x, y); rect (w * 0.3 , -h * 0.15 , w * 0.33 , h, 5 ); rect (w * 0.2 , -h * 0.15 , w * 0.66 , h * 0.85 , 5 ); rect (0 , 0 , w, h * 0.7 , 5 ); fill (colors[2 ]); myTriangle (w * 0.8 , h * 0.2 , w * 0.3 ); myTriangle (w * 0.2 , h * 0.2 , w * 0.3 ); rect (0 , h * 0.4 , w * 0.75 , h * 0.1 ); fill (colors[1 ]); rect (w * 0.8 , h * 0.45 , w * 0.1 , h * 0.1 ); rect (w * 0.2 , h * 0.45 , w * 0.1 , h * 0.1 ); pop (); endShape (); } function myTriangle (x, y, s ) { beginShape (); for (let a = 0 ; a < TAU ; a += TAU / 3 ) { vertex (x + (s * 0.5 * cos (a - (PI / 2 ))), y + (s * 0.5 * sin (a - (PI / 2 )))); } endShape (); }
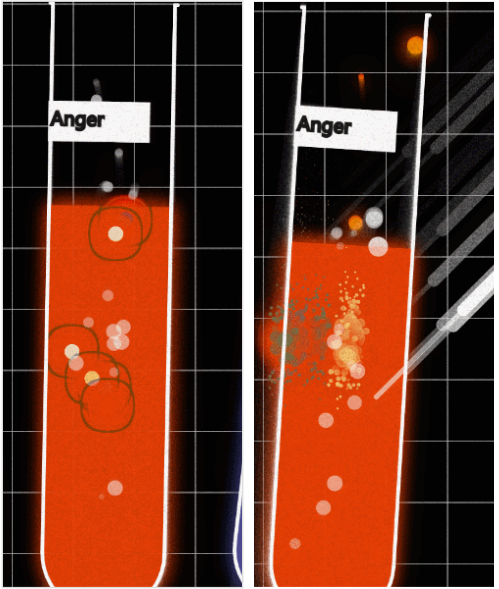
装有【愤怒】情绪粒子的试管。
以纯红色为溶液底色,情绪粒子为闪烁的不同颜色的圆点粒子,鼠标移动会让圆点粒子产生类似于溅射的效果。
纯正的红色就像是几欲爆发的火山岩浆。
再加上各色的【愤怒】情绪粒子,鼠标轻轻有所移动就会溅射爆发溅射。
这种感觉非常符合我心中的想象的【愤怒】情绪,就好像压抑已久的愤怒在轻微的外界环境变化下终于爆发:
“愤怒,遮掩不暇,一触即发。”
情绪粒子渲染实现代码使用新增的渲染方式,液体颜料溅射形状渲染 。
1 2 renderSpriteOnTrace_splatter (this .loc .x ,this .loc .y );
新增渲染方式的实现代码如下:
1 2 3 4 5 6 7 8 9 10 11 12 13 14 15 16 17 18 19 20 21 22 23 function renderSpriteOnTrace_splatter (bx,by ){ let c = colors[floor (random (colors.length ))]; bx += random (-2 ,2 ); by += random (-2 ,2 ); let mx = 4 *movedX; let my = 10 *movedY; for (let i=0 ; i<80 ; i++){ seed+=.01 ; let x = bx+mx*(0.5 -noise (seed+i)); let y = by+my*(0.5 -noise (seed+2 *i)); let s = 80 /dist (bx, by, x, y); if (s>12 ) s=12 ; let a = 255 -s*5 ; noStroke (); c.setAlpha (a); fill (c); ellipse (x,y,s); seed+=.01 ; } }
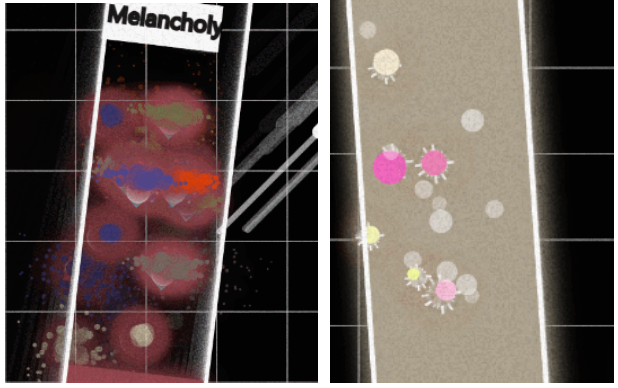
装有【忧郁】情绪粒子的试管。
以蓝紫色为溶液底色,情绪粒子为闪烁的不同颜色的圆点,方块等多种粒子,鼠标移动会让圆点方块粒子旋转效果加速,鼠标点击当前试管时粒子的填充色会消失。
主要通过色彩来体现情感。
偏冷色调的蓝紫比较符合忧郁的气息。
情绪粒子选用多种形状的图形混合物,色调也选用冰冷的蓝色系,混合稍微有些突兀的红,因为不想让它太过于单一。
“年少时代的忧郁是对整个宇宙的骄傲。”
情绪粒子渲染实现代码使用A1A2中以实现的渲染方式,图形集合渲染renderSpriteOnTrace_CircleRectSets 。
1 2 3 4 5 6 7 8 9 10 11 12 13 14 15 16 17 18 19 20 21 22 23 24 25 26 27 28 29 30 31 32 33 34 35 36 37 38 39 40 41 42 43 44 45 46 47 renderSpriteOnTrace_CircleRectSets (this .loc .x , this .loc .y ,random (10 ,25 ),shapecolors,frameCount,20 ,mouseX)function renderSpriteOnTrace_CircleRectSets (x,y,midR,colors,frameCount,rotateCount,mouseX ){ push (); translate (x,y); rotate (noise (frameCount/150 )*2 + mouseX/50 ); for (var i=0 ;i<rotateCount;i+=1 ){ rotate (i*PI *2 /rotateCount); noStroke (); let dotPos = sin (frameCount/100 +i + noise (frameCount/500 +i,i)/2 )*(midR/3 )*1.4 ; let clr = colors[i%colors.length ]; let sz = (cos (frameCount/2 +i)*20 ); let fillClr = color (clr); fillClr.setAlpha (200 ); strokeWeight (1 ); if ( random ()<0.85 && ( !mouseIsPressed )&& (frameCount+i)%80 >10 ){ fill (fillClr); } stroke (clr); ellipse (midR/2 *1.2 ,0 ,midR/20 ,midR/20 ); translate (dotPos/3 ,0 ); rotate (frameCount/100 ); rectMode (CENTER ); if (i%2 ==0 && (random ()<0.9 )){ ellipse (0 ,0 ,sz/2 ); }else { rect (0 ,0 ,sz/2 ); } translate (dotPos/3 ,0 ) rotate (-frameCount/100 ) if (i%2 ==0 ){ ellipse (0 ,0 ,sz) }else { rect (0 ,0 ,sz) } } pop (); }
搭配鼠标的响应函数mouseRelease和mousePressed函数对选中的试管和目标混合试管进行确定,实现部分核心代码:
1 2 3 4 5 6 7 8 9 10 11 12 13 14 15 16 17 18 19 20 21 22 23 24 25 26 27 releaseSound.play () if (mTube){ let targetTube for (let tube of tubes){ if (tube.isInRange (mouseX,mouseY)){ targetTube = tube } } notes[mTube.id ] && notes[mTube.id ].play () if (targetTube){ targetTube.targetLiquidColor = lerpColor (color ( targetTube.targetLiquidColor ), color (mTube.targetLiquidColor ),0.5 ) targetTube.targetLiquidHeightRatio +=0.1 let l=(targetTube.rendermode .length )%3 targetTube.rendermode [l]=mTube.id }else { let p = new Particle ({ color : color (mTube.liquidColor ), p : createVector (mouseX,mouseY), v : createVector (mouseX-pmouseX+random (-1 ,1 ),mouseY-pmouseY+random (-1 ,1 )).setMag (2 ) }) particles.push (p) } }
核心实现思路是用一个变量rendermode记录当前试管的渲染模式,当两只试管的液体进行混合时就在rendermode里添加该加入模式,并在emotionParticle粒子类里update函数中通过if-else语句判断,同时调用两种渲染方式。
1
2
3
4
5
6
7
8
9
10
11
12
13
14
15
16
17
18
19
20
21
22
23
24
25
26
27
28
29
30
31
32
33
34
35
36
37
update (r,id,randeff){ for (let i=0 ;i<id.length ;i++){ if (id[i]==0 ){ stroke ([255 ,255 ,255 ]); ellipse (this .loc .x , this .loc .y , r); }else if (id[i]==1 ) { rect (this .loc .x , this .loc .y ,random (5 ,20 ), random (5 ,20 )); }else if (id[i]==2 ){ var point=[]; point[0 ]=this .loc .x ; point[1 ]=this .loc .y ; renderTrace_colorPoints (point,5 , 20 , 0.1 , 0.9 ,240 ,100 ,150 ,3 ); }else if (id[i]==3 ){ renderSpriteOnTrace_wheel (this .loc .x ,this .loc .y ,random (5 ,10 ),frameCount,60 ,mouseX); }else if (id[i]==4 ){ renderSpriteOnTrace_pumpkin (this .loc .x ,this .loc .y ,20 ,20 ); }else if (id[i]==5 ){ renderSpriteOnTrace_splatter (this .loc .x ,this .loc .y ); }else if (id[i]==6 ){ renderSpriteOnTrace_CircleRectSets (this .loc .x , this .loc .y ,random (10 ,25 ),shapecolors,frameCount,20 ,mouseX) } } if (randeff==1 ){ renderSpriteOnTrace_overlapCircle (this .loc .x ,this .loc .y ); }else if (randeff==2 ){ stroke ([255 ,255 ,255 ]); rect (this .loc .x , this .loc .y ,random (-3 ,3 ), this .loc .y *random (0.3 )); }else if (randeff==3 ){ rect (this .loc .x , this .loc .y ,this .loc .x *0.3 +random (-this .loc .x ,3 ), this .loc .y *0.4 +random (-this .loc .y ,3 )); }else if (randeff==4 ){ drawBotsu (this .loc .x , this .loc .y ,random (5 ,10 )) rect (this .loc .x , this .loc .y ,random (0 ,10 ),random (0 ,10 )); } }
Remark:
需要稍微做一点限制,不然随着实验的反复进行,rendermode会愈来愈长,渲染效果变慢。
1 2 3 4 let l=(targetTube.rendermode .length )%2 targetTube.rendermode [l]=mTube.id
为了更直观的表现随机性在实验的过程中可能可能会出现随机的效果。
1.亮黄色光环renderSpriteOnTrace_overlapCircle
2.白色细长框条
3.彩色变换颜色框条
4.褐色系方形小点
下面是在对情绪溶液进行混合时,可能产生的随机事件:
主要有溶液颜色发生变化,或者是产生了不一样的情绪粒子特效。
1 2 3 4 5 6 7 8 9 10 11 12 13 14 15 16 17 18 19 20 let p=random ();if (p<0.1 ){ targetTube.randEffect =1 ; } else if (p<0.15 ){ targetTube.randEffect =2 ; }else if (p<0.20 ){ targetTube.randEffect =3 ; }else if (p<0.25 ){ targetTube.randEffect =4 ; }else if (p<0.28 ){ targetTube.liquidColor =[255 ,204 ,204 ] }else if (p<0.30 ){ targetTube.liquidColor =[255 ,255 ,255 ] }else if (p<0.35 ){ targetTube.liquidColor =[random (255 ),random (255 ),random (255 )] }
在emotionParticle类中的渲染函数update中添加如下效果:
1 2 3 4 5 6 7 8 9 10 11 if (randeff==1 ){ renderSpriteOnTrace_overlapCircle (this .loc .x ,this .loc .y ); }else if (randeff==2 ){ stroke ([255 ,255 ,255 ]); rect (this .loc .x , this .loc .y ,random (-3 ,3 ), this .loc .y *random (0.4 )); }else if (randeff==3 ){ rect (this .loc .x , this .loc .y ,this .loc .x +random (-this .loc .x ,3 ), this .loc .y *0.4 +random (-this .loc .y ,3 )); }else if (randeff==4 ){ drawBotsu (this .loc .x , this .loc .y ,random (5 ,10 )) rect (this .loc .x , this .loc .y ,random (0 ,10 ),random (0 ,10 )); }
最后,当出现随机性效果时,使用文字在试管上方进行提示:
1 text ("Experimental number #" + targetTube.id +"\n出现了随机性效果!" ,targetTube.p .x -40 ,targetTube.p .y *0.7 )